


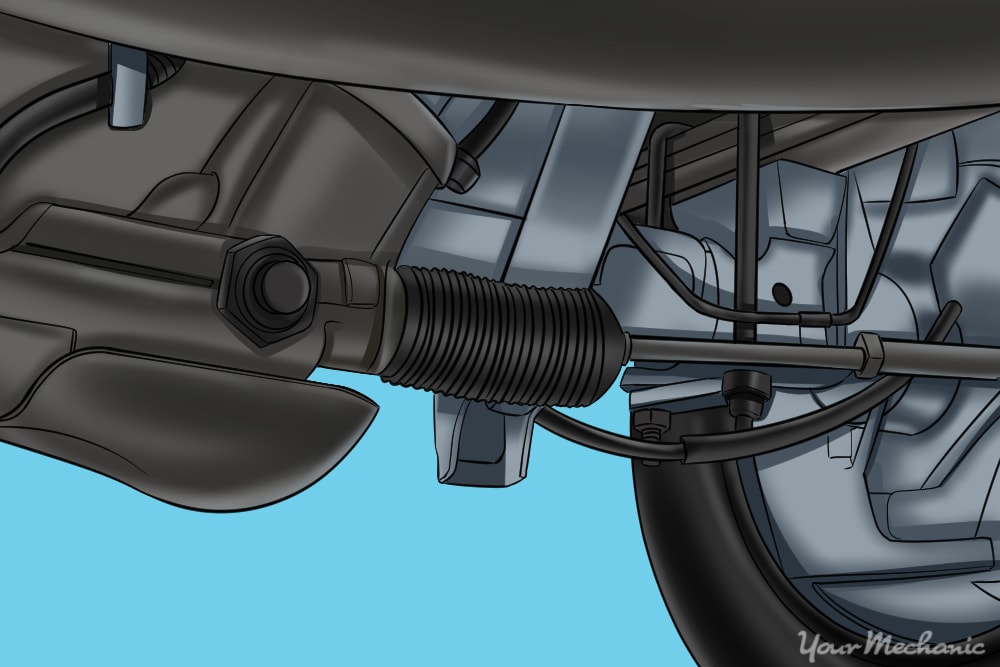
It is very important to replace axle seals because major damage, such as saturated brake pads and shoes andbrake failure。轴泄漏还可能造成差异环,小齿轮和轴承组件的重大损坏,从而在严重的情况下破坏了整个后轴。
到那个时刻replacing axle seals, it is always best to replace both seals in the rear axle, since in the rear axle you must access the differential housing in order to release the axle shafts to remove. When releasing the axle shafts, you can release both in that single process.
Common signs如果发生严重泄漏,则车轴轴密封件包括在密封件周围泄漏和流体水坑。轴也可能会完全弹出,因为轴轴密封不仅可以保持流入,还可以作为对车轴本身的支撑。
第9部分:抬高和固定车辆
Materials Needed
- Hydraulic jack
- Jack stands
- Tire iron
- Wheel chocks
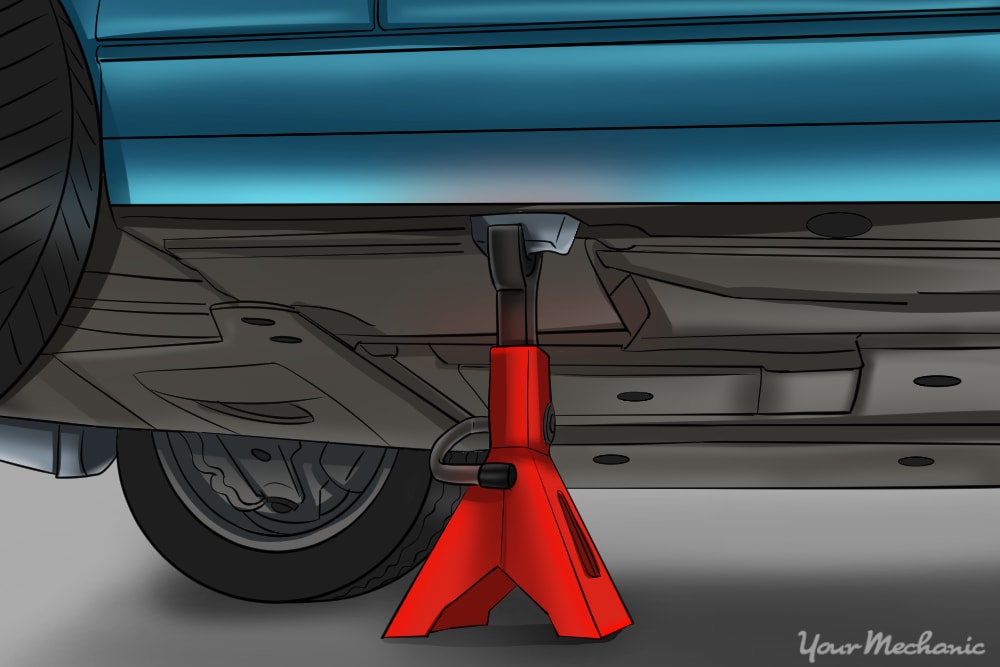
步骤1:将轮盖放在前轮之一的前后。This will keep the vehicle from moving.
步骤2:抬起车辆。将液压插孔放在车主手册中指定的适当起升点上。
After you get the jack placed at the lifting point, get the jack started by lifting it up to the proper position. This will make it easier to remove when the axle is supported on jack stands.
步骤3:固定杰克架。Lift the axle high enough that the wheel is off the surface and you are able to set a jack stand underneath the axle.
Do this for both sides.
Step 4: Remove wheel nuts and wheel。After placing both jack stands underneath the car, remove the wheel nuts completely and remove the wheel.
步骤5:将车辆放在中立。After the vehicle is secure, put the vehicle in neutral.
Part 2 of 9: Removing the brake rotor or brake drum
Materials Needed
- 3/8” ratchet with metric and standard socket set
- 1/2” ratchet with metric and standard socket set
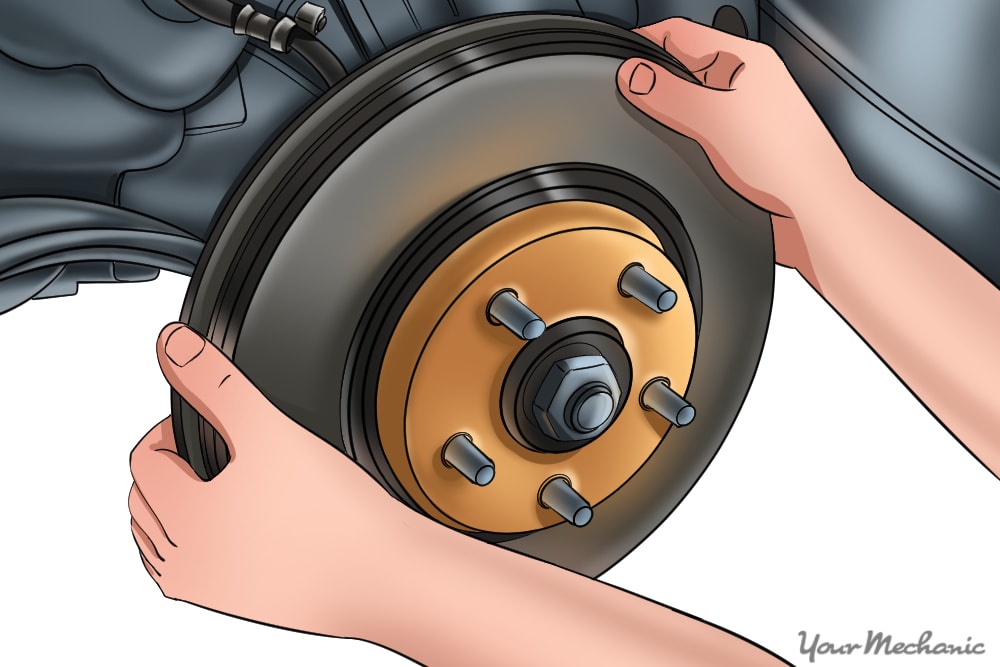
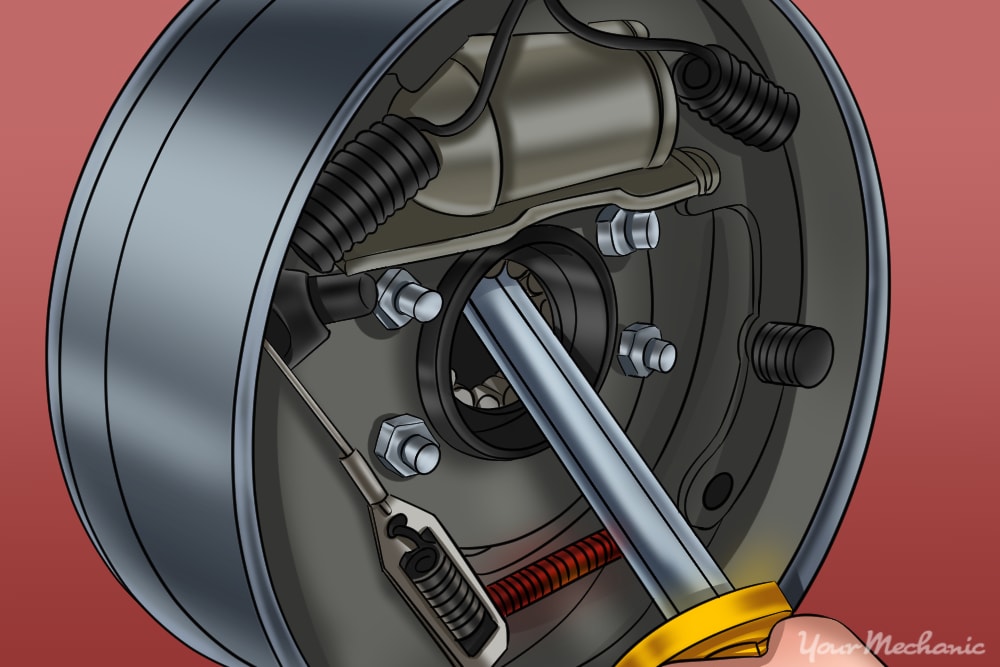
Step 1: Remove the brake caliper。卸下车轮后,使用棘轮卸下制动卡钳。
The brake caliper retains the brake pads; the caliper is the part that applies pressure and stops the vehicle.
Step 2: Remove the brake caliper bracket。After removing the brake caliper, depending on the vehicle, there might be a brake caliper bracket.
If you don’t have a brake caliper bracket, your brake rotor should slide right off the axle flange (the mounting surface your wheel mounts to) and expose the entire flange.
If your vehicle does have a brake caliper bracket, remove the two mounting bolts that secure it. This may require a longer ½” ratchet to remove.
步骤3:卸下制动转子。After removing the brake caliper mounting bracket, you will then be able to remove the brake rotor.
卸下制动转子将露出轴法兰。
第9部分9:排出差分
Materials Needed
- 1/2” Torque wrench
- Drain pan
- Hammer
- Metal scraper
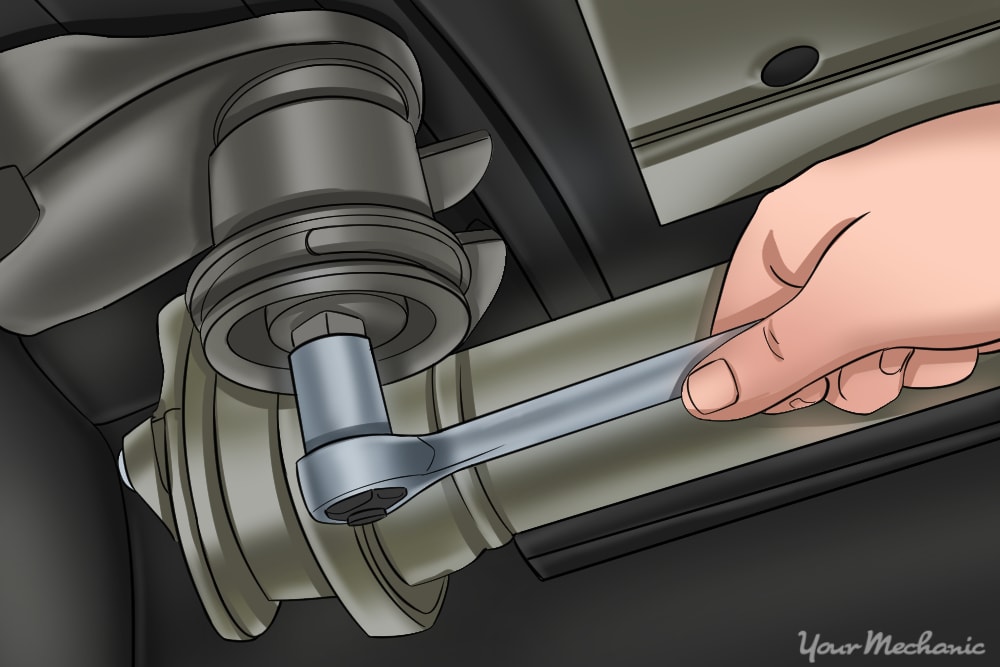
步骤1:卸下安装螺栓。To drain the differential, remove all the mounting bolts except one for one at the top of the differential cover.
Step 2: Get drain pan ready。将排水盘放在差速器下方。
Step 3: Drain the fluid。Take your scraper and place it in between the differential cover and the axle house.
With the scraper in that position, slightly tap the scraper handle, increasing the force as needed to cut through the silicone seal. This will release differential fluid, so be sure the drain pan is placed in the correct position to catch the fluid that is leaking.
Step 4: Remove the differential cover。Remove the remaining bolt and set the cover aside with the mounting bolts.
第9部分,共9部分:卸下轴固定夹
Materials Needed
- Drain pan
- 手电筒
- Telescoping magnet
- Towels or rags
Step 1: Locate and remove the pin。Rotate the axle by rotating the driveline that goes into the differential.
Rotate the driveline and watch the differential ring and pinion as it rotates until you see a small retaining bolt retaining a long pin in the center of the spider gears. This pin holds the small gears inside of the ring and pinion carrier all together and in line.
当您发现小固定螺栓时,请尝试以可以卸下大销且不必旋转车轴的方式定位载体。
一旦获得位置,请卸下固定螺栓,然后将大销从车轴上滑出。如果需要,请使用磁铁使其滑出。将固定螺栓放在一边。
Step 2: Remove the retaining clip。Push your axle towards the differential opening; you will notice the slop or movement of the axle.
这将使您可以拿起磁铁并卸下轴固定夹,如有必要,将其闪烁。如果您遇到困难,请确保剪辑可以通过手电筒抬起并用手指感觉到它。
You should be able to move it around and possibly remove it with your fingers. If it isn’t moving freely, be sure to try and get the axle to slide back out and then back in, and retry the second step again.
Step 3: Slightly pull out the axle。Once you removed the axle retaining clip, the axle is free to pull out of the housing.
在卸下之前,您需要将第二个排水容器放在轴管末端的下方。取几个破布,抓住车轴法兰,稍微将车轴拉出。在拆卸过程中,从车轴外壳中出来时慢慢擦拭车轴轴。
第9部分9:卸下车轴
Materials Needed
- 24” pry bar
- Axle seals (2)
- Brake cleaner
- Differential fluid
- Hammer
- Seal installing/driver kit
- Seal removing tool
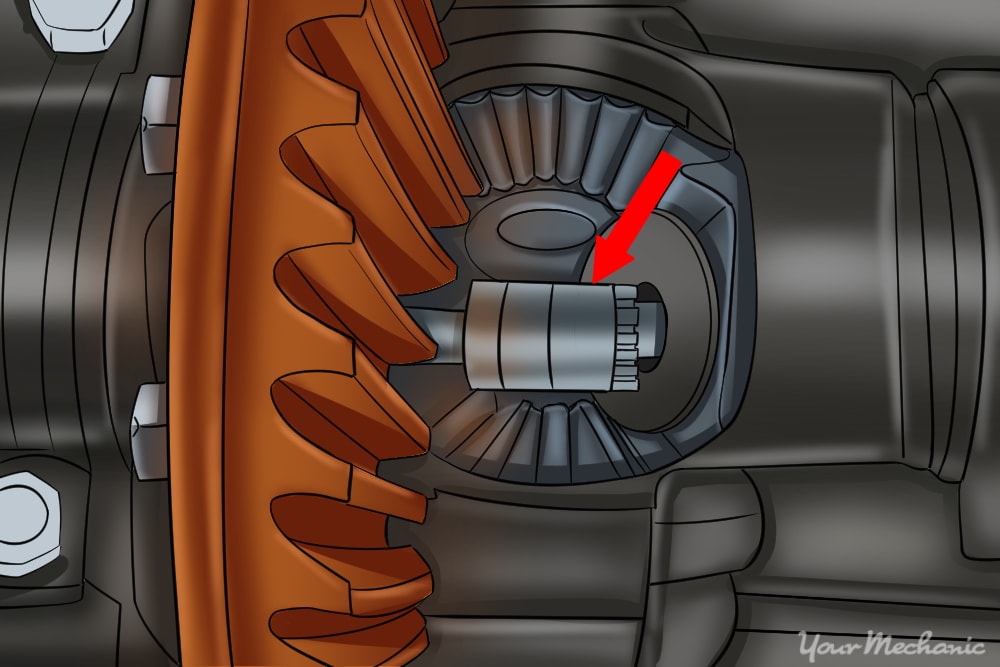
步骤1:卸下密封。Hook the inside of the seal with the hooked end of the seal puller and pull or push depending on your position.
The tool rolls the old seal out by only pulling up on one edge. In some cases, the seal puller won’t be able to remove the seal. In that event, you can get a long pry bar that is at least 24 inches long.
Using the same technique, put the edge of the pry bar on the inside edge of the seal, and gently push the pry until the seal begins to lift out. Remove the seal completely.
步骤2:清洁轴管和密封。Clean the inside of the axle tube with brake cleaner and wipe up where the seal will be installed.
Step 3: Take the new seal and find the appropriate seal installing tool。
Step 4: Get the seal started。With the seal in the right position, gently get the seal started by using a hammer and slightly tapping it into position.
Once in place, set your seal driver flush on the seal face, and use your hammer to drive the seal into place until completely flush and flat on the axle housing.
Step 5: Run fluid around the seal。After installing the seal, take some differential fluid with your fingers and run it around the inside of the seal.
Repeat these steps for the opposite side.
第9部分9:安装车轴
Step 1: Install the axles。通过在不捏密封的情况下轻轻插入车轴端来执行此操作。
It will take some shifting and shimmying to get the axle to slide into the carrier and seated into the seal. Once you see the axle is inserted all the way, visually inspect the seal for a proper seat.
您不想被密封的滚动或损坏。如果密封安装后损坏,则需要再次更换密封。
步骤2:固定固定夹。Slide the axle retaining clip over the end of the axle slot, and push out the axle shaft to prevent the axle retaining clip from falling off.
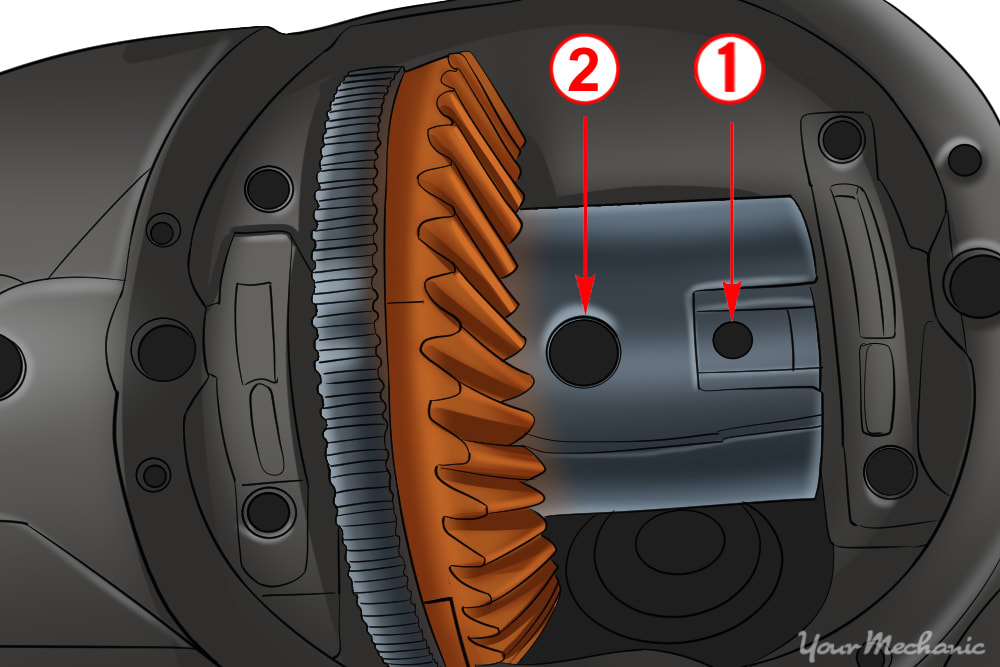
Step 3: Slide the carrier pin into the assembly。Once the axles are installed and retained, you will need to slide the carrier pin (2 on above illustration) into the carrier assembly.
When you put the pin back into the carrier assembly, be sure that you have the threaded hole lined up for the retaining bolt (1 on illustration above) to be installed and torque to specifications.
Part 7 of 9: Installing differential cover
Materials Needed
- 1/2” torque wrench
- Brake cleaner
- Metal scraper
- RTV silicone
Step 1: Scrape off old silicone。Start by taking a scraper and scraping off any old silicone on the cover and the differential housing.
You want to get the surface free of any debris or old silicone. Take your brake cleaner and spray off any debris, and wipe the mating surfaces of the differential cover and the axle housing.
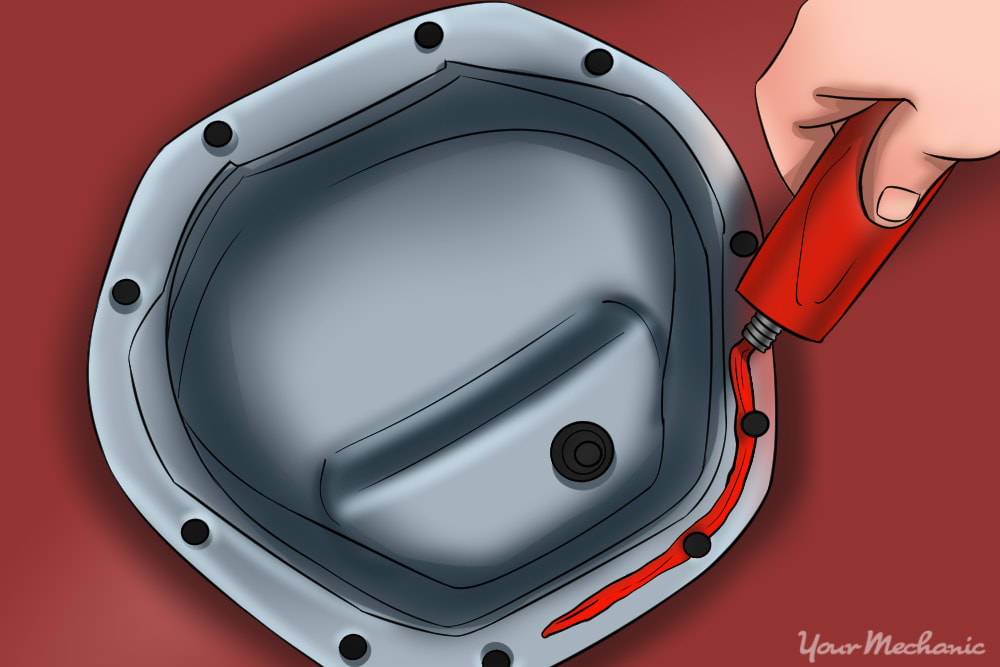
Step 2: Apply new silicone。将RTV硅酮的大约四分之一英寸珠子放在差速器盖上。
The bead of silicone should run along the center of the mating surface. Swoop towards inside cover around the mounting holes.
Step 3: Reinstall differential cover。Having your mounting bolts ready and easy to reach, put your differential cover on to the axle housing.
Hold the cover in one hand thread the bolts with the other.
Step 4: Torque mounting bolts。遵循推荐的车辆制造商的扭矩规格。
Part 8 of 9: Adding differential fluid
Materials Needed
- ½” torque wrench
- C-clamp
- Differential fluid
Step 1: Remove fill plug。Remove the fill plug that is located on either the right side or left side of a differential housing.
在某些情况下,很难找到;您可能必须刮去旧的油脂或泥浆才能看到它。在大多数情况下,您将能够使用⅜”棘轮去除插头。在极少数情况下,您可能需要一个十六进制的头部插座。
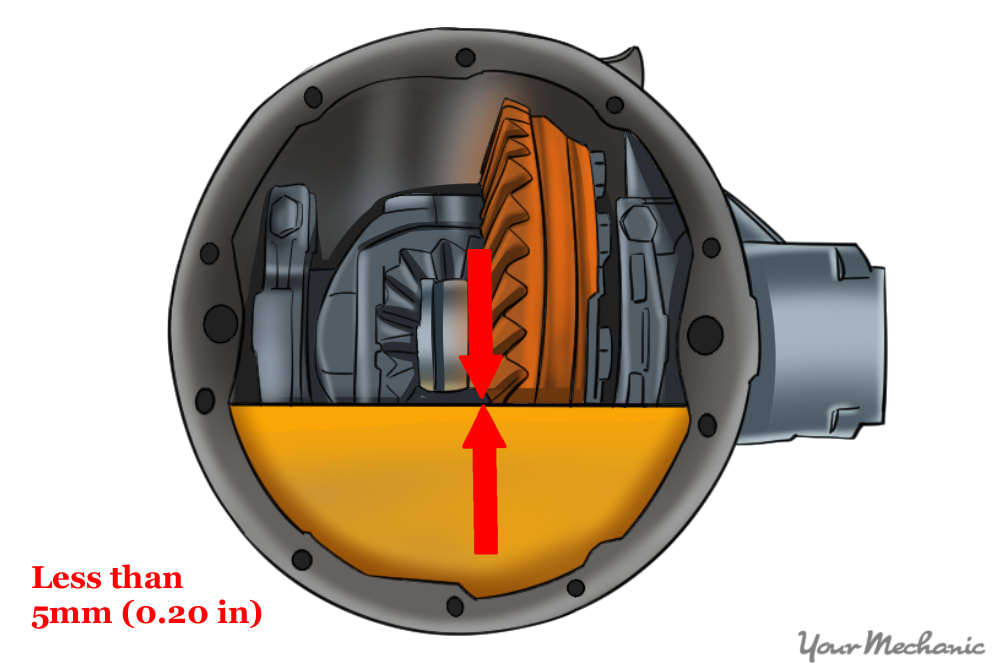
Step 2: Know the fluid capacity。在用差分流体填充差分外壳时,最好在所有者手册中找到流体能力。
When filling the differential with fluid, you want to be able to feel it just below the fill hole. The best way to check will be to use your finger to find out the level of the oil.
- 警告:不要过度填充,因为这可能会导致泄漏。
步骤3:重新安装制动零件。重新安装转子,制动卡钳支架和安装螺栓,收紧制造商的扭矩规范。
You may have to use a C-clamp to compress the caliper if it won't go over the rotor when installing the caliper. Tighten the brake caliper mounting bolts to the manufacturer's torque specifications.
Step 4: Install wheels and wheel nuts。Put the vehicle back into park and install the wheels and start wheel nuts.
将驻车制动器放在车辆上,以锁定后轮。这将使您的车轮螺母稍微拧紧,然后将车辆放回地面。
Step 5: Tighten the lug nuts。After getting the vehicle back onto the ground, tighten up the lug nuts with a torque wrench to the manufacturer's torque specs.
第9部分9:测试驱动器
Step 1: Test drive your vehicle for a short trip。This helps get the differential fluid working through the axle.
After the short drive, recheck the differential fluid by removing the fill plug on the differential. Use your finger to check the level and, if it is low, add what is needed.
The axle seals serve the purpose of keeping differential fluid in and keeping dirt, dust, and water out. Contamination can quickly ruin fluid which can ruin bearings, seals, and even the major components like the ring and pinion. Keeping an eye on fluid leaks and odd or abnormal noises coming from your axles can help prolong your vehicle’s life. Ifreplacing your axle shaft sealis something you would rather leave to a professional, have one of YourMechanic’s certified technicians perform a replacement.


